 JavaScript
How to add styles to stripe elements without using…
Stripe is a great way to make payments for your web or mobile platforms. Being a full service payment platform, Stripe also gives you a variety of SDKs to implement your backend and frontend code with the best compliance options. In this tutorial you will learn how to add styles to stripe elements if you don’t want to use existing styles of the card input.
1. Adding elements input to your web
First you will need to create a stripe account and get its public secret key to initialise authentication for payments. If you have that you will need to wrap your payment component with initialised Elements provider component.
import React from "react";
import { Elements } from "@stripe/react-stripe-js";
import { loadStripe } from "@stripe/stripe-js";

export interface CreateCardPaymentProps {
  onCreatePaymentMethod: (id: string) => void;
}

const stripePromise = loadStripe(
  "pk_test_k3jL***"
);

const CreateCardPayment: React.FC<CreateCardPaymentProps> = ({ onCreatePaymentMethod }) => {
  return (
      <Elements stripe={stripePromise}>
        <CreateCardPayment onSuccessCard={onCreatePaymentMethod} />
      </Elements>
  );
};

export default CreateCardPayment;
Here Elements acts as the stripe provider. Note that this needs to provided in a higher order component so you can probably define in app root component as well. But if you dont need elsewhere you can declare it in the immediate parent component.
2. Add styles to stripe elements
If you need to fully customise the input, you cannot use the CardElement the component as explained in the examples.
Instead you can use following components.
CardNumberElement– Enter card number Ex: 4242 4242 4242 4242CardExpiryElement– Expiry number Ex: 11/22CardCvcElement– CVC of the card Ex: 111- Card holder name – Use an input with similar styles of the above inputs Ex: John Doe
From above you need to first create the card input components. First we will take the card number.
<CardNumberElement
   options={{
   style: {
     base: inputStyle,
   },
 }}
/>

const inputStyle = {
      iconColor: '#c4f0ff',
      color: '#ff0',
      fontWeight: '500',
      fontFamily: 'Roboto, Open Sans, Segoe UI, sans-serif',
      fontSize: '16px',
      fontSmoothing: 'antialiased',
      ':-webkit-autofill': {
        color: '#fce883',
      },
      '::placeholder': {
        color: '#87BBFD',
      },
}
The UI will look like following which give you only an input field. It doesnt look good but we can give the styles we need using the next steps.

Apart from base there are several other styles tags you can use with options params.
:hover
:focus
::placeholder
::selection
:-webkit-autofill
:disabled, available for all Elements except the paymentRequestButton Element.
::-ms-clear, available for the cardNumber, cardExpiry, and cardCvc Elements. Inside the ::-ms-clear selector, the display property can be customized.
Also you can customise following fields other than base for error or invalid inputs.
base, base variant—all other variants inherit from these stylescomplete, applied when the Element has valid inputempty, applied when the Element has no customer inputinvalid, applied when the Element has invalid input
You can refer it from API https://stripe.com/docs/js/appendix/style
3. Adding borders and make it looks like other inputs
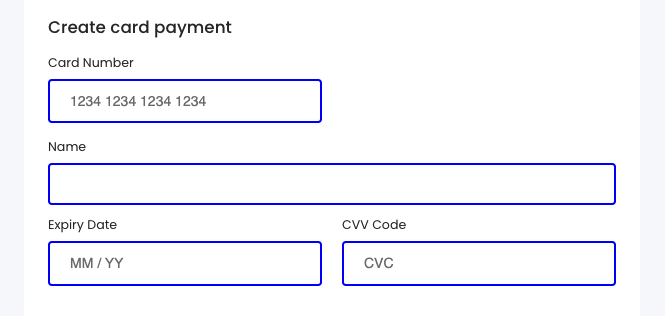
This will give you how to style the input component for the card number. To add a border a any other styles around this, you can wrap this inside a wrapper div component
<CardInputWrapper>
    <CardNumberElement
      options={{
        style: {
          base: inputStyle,
        },
      }}
    />
</CardInputWrapper>

const CardInputWrapper = styled.div`
  border: 2px solid #00f;
  border-radius: 8px;
  padding: 20px 4px;
`;
You can do the same for the CVV and Expiry code as shown in the above image.
4. Create Card payment using the CardNumberElement
Then you can insert the payment submit the card details using the card number input you have provided as follows. When you create the element with card number, it will take CVC and Expiry date by default. But you have to add the name of the card as a param to the create payment method input.
import {
  useElements,
  useStripe,
  CardNumberElement,
  CardExpiryElement,
  CardCvcElement,
} from "@stripe/react-stripe-js";

export interface CreateCardPaymentProps {
  onSuccessCard: (id: string) => void;
}

export const CreateCardPayment: React.FC<CreateCardPaymentProps> = ({onSuccessCard}) => {
  const [name, setName] = useState("");
  const elements = useElements(); // use element provider state
  const stripe = useStripe(); // stripe sdk

  const onSubmit = async () => {
    if (!stripe || !elements) {
      return;
    }
    // card number element as the card element
    const cardNumberElement = elements?.getElement(CardNumberElement);

    if (cardNumberElement) {
      const {error, paymentMethod} = await stripe?.createPaymentMethod({
        type: 'card',
        card: cardNumberElement,  // pass as card
        billing_details: {
          name, // name of the user
        },
      });

      if (!error && paymentMethod?.id) {
        onSuccessCard(paymentMethod.id);
      } else {
        onError();
      }
    }
  };
}

return (
 ...
    <CardInputWrapper>
      <CardNumberElement
        options={{
          style: {
            base: inputStyle,
          },
        }}
      />
   </CardInputWrapper>
  ...

  <button onClick={onSubmit}>Pay with card</button>
);
With above code you can make the card payment using the card number elements and get the payment method id for your payment intent.
You can refer more details on stripe inputs from following references:
React Example: https://stripe.com/docs/stripe-js/react
Create Payment Method: https://stripe.com/docs/js/payment_methods/create_payment_method
Styles: https://stripe.com/docs/js/appendix/style
If you have any question leave a comment below and I will improve above post.


